6.27.2011

Mammoth Lampshades

Today's Makeover Monday is another re-vamp of a thrift store find.  I fell in love with the scale of these lampshades and had to have them.  I was so excited to be able to use them in the Design House, but they weren't very exciting in their original state.

Using a great Waverly print (Sea Scallop) from U-Fab, I gave them a new, even funkier look.  Here's how:


Use the lampshade as a guide to cut out the fabric. 
Start at the seam and roll the lampshade along the fabric, guiding a pencil.
Add 1/2 inch to this line and cut along that line.


Starting at the seam on the lampshade, run a line of hot glue and secure the fabric. 
Continue with the glue gun at the top and bottom of the lampshade rim. 
Score the excess fabric and bend over the rim, gluing with the hot glue gun.
I chose to finish the inside with gimp to leave clean edges.
And here it is:
They make a great statement!
Like these shades, but not into the crafty bit?
I'd be happy to help!

6.20.2011

Desk Makeover

Hopefully I've given my readers some time to recover from the all of the Design House postings.  I really needed some time to focus my energy on something new, but realize I need to fulfill my promise to post some how-to's from my pieces there.  Today, I am featuring the desk re-vamp.

I found this guy at Goodwill for a song.
 The top had seen better days and how about those federal-style drawer pulls?!  But the size was perfect.

I gave it first a coat of glossy white paint all over. And then I found this:
 It's a crocodile embossed scrapbooking paper.  Not sure who would cover it with photos, but that's another story.......  I'm no expert in decoupage, but if you're really intrigued and looking for inspiration for projects, check out Mod Podge Rocks.  So many cool applications for this stuff!

Anyhow, I chose to put this awesome paper on the fronts of the drawers.  Using a straight edge cutter (I am physically unable to cut a straight line with anything else), I cut the paper to the size I wanted.

Because I am messy and impatient, I squirted the mod podge directly onto the drawer and spread it with a paint brush.
I put the paper on top of the wet mod podge and  used a wooden skewer to punch a hole in the paper where the drawer pull needed to go.
Another coat of Mod Podge to seal it,.
I found some funky new drawer pulls at the Habitat Store to finish off the drawer fronts.  After some drying time, I installed them and covered the damaged top with fabric topped with glass and "voila".....new desk!

Of course, with that gorgeous chair from U-Fab in front of it. the desk looks extra fabulous!
What a stylish place to do homework!

Need some help incorporating crafty pieces in your home?
Contact me! 

6.13.2011

Makeover Monday: Color and Reflection Injection

My client for today's makeover truly couldn't be any cuter and she and her boyfriend are great young DIY'ers.  My job for her has been to generate decorating ideas and they have been hard at making them come to fruition on their own.  We started with her living room.  It's a great space, new construction, but the homeowner was not thrilled with the placement of the television or the flow of the room.  Here it is before:

I suggested adding a some color with fabric and a new rug and then found a great console to anchor the television.  It's not too deep to use up too much of the space and the mirrored doors actually add depth visually.

 I suggested a new furniture arrangement to open the room, but still allow for conversation.  Beautiful plaid taffeta drapes dress up the windows and a new chandelier gives this space some character.

BEFORE:
 AFTER:
This chandelier is a great illustration of my client's hard work; she refinished a brass chandelier she already had to coordinate with the space and added shades.  Great job!
Need some direction with your projects?
I'd love to help!

6.06.2011

Volumes of "Volumes"

When I first entered the home featured today, I thought I wasn't really needed.  Then I saw this:
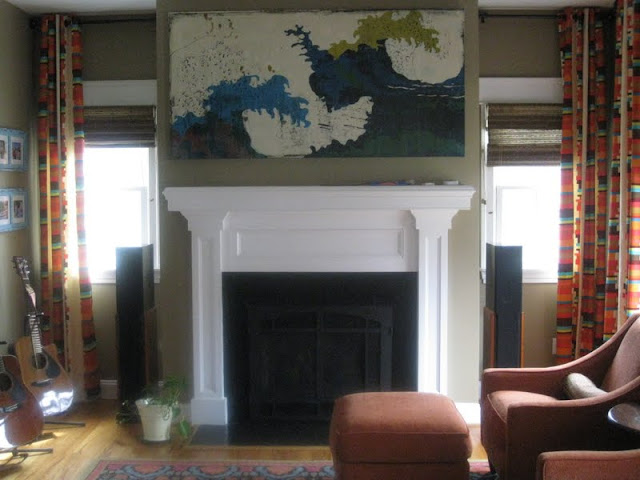
Look familiar?!  I see it all of the time.  A myriad of color choices, flat builder's paint on the walls and a perplexed homeowner.  There was no question the old paint had seen better days and my client really wanted to change the color and make some slipcovers for her chairs..........I couldn't help but interject that what the room really needed to pull it all together was some window treatments.  Clearly, my client has great fun taste and is not afraid of color.  Here is the rug that was already in the room:

Such amazing color and print!  And the room had great pieces.  Check out the orange chairs and amazing art above the fireplace:
This is the BEFORE!!
To finish the room I suggested a neutral paint color in a taupe from the rug (it's there if you look hard).  But to really pull it all together, I wanted a graphic print on the windows in the colors from the rug. I found this amazing amazing print from Anna Maria Horner called "Volumes".  Check out the colors:
Just perfect with that rug!
And here they are:

We did a little furniture shuffle and added some turquoise frames on the wall.
The homeowner is still working on a coffee table, but the effect of the drapes makes the room feel much more finished and ties all of the color together.
I'll keep you posted when the room is complete.

Needing help deciding how to finish your room?
I'd love to help!

6.03.2011

Beach Inspiration

We spent Memorial Day weekend in this cute little cottage my sister found on the Outer Banks.  It was full of cute beach-y decor sure to inspire!

A garland of starfish tied to jute dresses the window.
Another cute use of starfish.  These guys are glued to a stake and placed in a vase hung on the wall.
A fresh vignette with a happy citrus painting and distressed seafoam console table.


Cute casual fabrics with a hint of beach theme -- see the quilted shells on the bench and the fish in the damask print?


I love some zebra print -- at the beach?  Why not?!  Check out the cute frames spelling out BEACH in the entertainment unit!


More beachy details.
Love these ideas for the kitchen!  Seagrass lampshades, a vintage looking large clock and wine bottles simply spray painted in fun colors on top of the cabinets.


So, if you're not lucky enough to be heading to a seaside retreat, maybe you can incorporate some of these cute ideas into you decor at home.
Need some help?
Contact me!